
Receiving an error message that states your PC doesn’t meet the minimum system requirements can be a crushing blow.
You might be pleased to hear that there is a solution that doesn’t involve buying new costly hardware. This article will teach you how to increase VRAM in Windows 10.
When it comes to enhancing your computer’s performance, the most evident and reliable solution is to upgrade your rig to enjoy a superior gaming experience. Unfortunately, that option is not accessible to everyone. We will help you get the best out of whichever graphics card you already have without upgrading your hardware.
Before going further, it’s essential that we explain what video RAM is and what it is used for.
Table of ContentsShow
VRAM (Video Random-Access Memory)
This type of RAM is designed for supporting the GPU (graphics processing unit) just like the system RAM assists the CPU (central processing unit).
While the system RAM directly communicates with the CPU regarding any tasks your PC performs, the VRAM only operates in the graphical domain and is charged with very particular video rendering-related responsibilities.
There are plentiful tasks that the GPU is exceptionally well optimized to perform.
As such, it also needs a highly effective memory to perform those tasks as rapidly as possible. Unlike an iGPU (integrated graphics processing unit), which uses a portion of the system memory, standalone GPUs have their own memory.
As a result of this vital symbiosis, VRAM will physically be very near to the GPU to ensure the fastest possible communication.

VRAM is vital for tasks such as frame buffering and texture mapping. This data is essential for the GPU to render images at the fastest possible speed and the highest possible quality. This is why a lack of VRAM can be a major detriment to your gaming experience.
Tips And Tricks
Fortunately, there are some exceptional tricks that can help you get the best possible results out of the VRAM you already have. It’s always good to try these before you move on to more complicated (or expensive) solutions.
Reduce The Need For VRAM
This might sound self-evident, but if you can limit how much VRAM the game you’re playing requires, you might be able to get satisfactory results without increasing your VRAM.
One of the most essential things that you have to pay attention to, and something that can substantially reduce the VRAM requirement, is the resolution at which you play your chosen game. Most modern PC games have an in-game setting that allows you to adjust the resolution.
The math is straightforward: the lower the resolution, the fewer pixels that need to be rendered, which results in decreased VRAM usage.
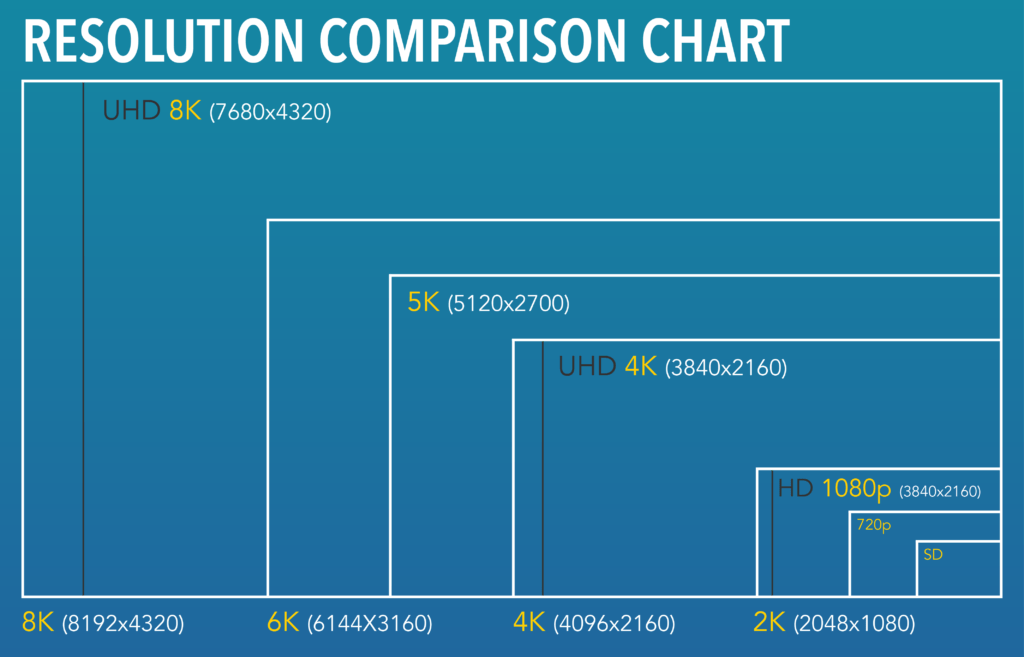
A drastic but enlightening example is that gaming at 720p requires just 2 gigabytes of VRAM, while going with a somewhat higher resolution of 1080p will need anywhere between 2 and 6 GB of VRAM.
The frames generated are used by the frame buffer and consume space. An image at 1080p needs 8.3 MB and at 4K, it requires 33.2 MB.
Reducing the texture details can also help significantly, but decreasing the anti-aliasing could be even more advantageous. The anti-aliasing process renders the same image multiple times to smooth out those troublesome jagged edges.
If you don’t mind those jagged edges and they don’t impact your gaming, you can turn it off completely to boost VRAM.
However, there’s only so much you can gain by lowering the details and turning off anti-aliasing. Even less graphically demanding games will still need a particular amount of VRAM to run efficiently.
Another useful tip, although this might seem clear, is turning off any extra software running in the background that might be consuming VRAM.
Although a simple screen capturing application such as Fraps doesn’t use the graphics card exclusively, with some settings where the images are immediately compressed, your GPU will be tasked with extra work.
If you truly require to record your screen, it’s ideal to capture the images in their native format, although that will impose a heavier burden on your RAM, and storage will fill quickly.
Connecting Two Or More GPUs Via SLI Or Crossfire Won’t Help

Due to how these two outdated technologies function, they can’t really take advantage of the multiple VRAM available. This is because they operate in a master-slave configuration where one graphics card will be in charge of the remaining.
While using Crossfire is feasible with two graphics cards featuring different amounts of VRAM, it isn’t recommended as only the VRAM of the GPU with the lowest amount will be considered. As far as SLI goes, the option to connect two graphics cards with separate VRAM is impossible.
NVIDIA’s NVLink is an exceptional solution. With it, the total amount of VRAM of all GPUs will be put to use. Although this won’t be the exact sum of the two VRAMs, it will be fairly close and beneficial.
However, as most NVLink-compatible cards are relatively recent, you probably won’t need to increase VRAM anyway. It’s still good to know that there is a rather simple solution, should you ever stumble upon this issue.
It might not sound beneficial, but it’s possible that you have an old GPU if you’re experiencing low VRAM issues. In this case, getting a new GPU of the same model will be much less expensive than buying a new graphics card.
‘Trick’ The Game Into Thinking There Is More VRAM Available

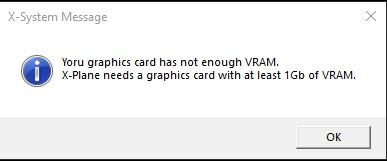
If you lack sufficient VRAM, it’s likely that certain games won’t initiate and instead display an error indicating your insufficient VRAM.
Please note that this will only work on an embedded graphics card, whether it is Intel’s HD Graphics or AMD’s integrated APU.
Most games do this to ensure they aren’t being run at a low FPS. Developers use this strategy to prevent angry mobs with torches at their offices, demanding excellent FPS.
How games scan for this is by checking out the registry and seeing how much VRAM is accessible. Before we move on to the real “trick”, let’s see how to find information on how much VRAM we currently have access to.
How To Check How Much VRAM You Have
- Press Windows Key + R and type in “ms-settings:display“.
- This will lead you to your PC’s display settings. Scroll down to the “Advanced Display Settings” and click it.
- Here, you can click the “Display adapter properties for Display 1” option.
- In the “Adapter” tab, you will find the exact amount of dedicated video memory on your PC.
This will give you an accurate understanding of how much extra VRAM is needed and how precisely you should address this in the next step.
Before we explain how to modify the registry, it’s crucial to mention that this “trick” doesn’t actually increase VRAM but rather displays a certain amount of it to the game. Although this doesn’t actually boost the performance, it should allow you to start the game if it refuses to launch because of a lack of VRAM.
It’s also essential to remember that there is a reason why games cannot load when you have inadequate VRAM. A game won’t work correctly and could be hardly playable.
Changing The Registry
- To access the registry and be able to edit it, you need to press Windows Key + R and then type in “regedit‘”.
- Here, you need to look for the “HKEY_LOCAL_MACHINE” folder on the left-hand side of the window.
- Expand it and look for the “SOFTWARE” folder, then find the “Intel” folder and right-click it.
- In the dropdown menu, click on “New” and then on “Key“, which you will name “GMM“.
- Press “Enter”, then right-click the newly-created GMM folder and again look for “New“. However, this time, select “DWORD (32-Bit) Value” and name it “DedicatedSegmentSize“.
- Double-click the registry you’ve just created, and a window will appear, prompting you to change the value. You can choose any number between 0 and 512, but be sure to select the decimal base.

Click OK, restart your computer, then attempt launching your game.
Changing VRAM In BIOS/UEFI

This is the sole authentic way to increase VRAM. However, there will be a limit to how much difference it can make. It also won’t be available on all motherboards, but it should be fine for the vast majority.
Also, as BIOS came first, it remained in people’s minds, and many who were already accustomed to the term refused to change when UEFI, its successor, replaced it. We’re mentioning this because we will use the term BIOS, despite this setting being possible in both, simply to avoid confusion.
In order to access BIOS, you need to restart your personal computer.
- The issue here is that, depending on your motherboard, you will need to press a different button to boot BIOS. Those buttons are typically F2, F8, F9, F12, or the Del key. It’s best to find out which button you should press, either in a manual or via the manufacturer’s website.
- As modern PCs boot quickly, you need to be quick to press the required button at the right time. The trusted method is to simply mash the button repeatedly from the moment you restart your computer.
- Once you access the BIOS, you need to look for “Advanced Chipset Features“ or “Advanced Features,” depending on your motherboard. Once you are inside that tab, search for “VGA Share Memory Size“, “Graphics Settings“, or “Video Settings“, something along those lines.
- Inside is your goal. You simply need to change the “Pre-Allocated VRAM” to an option that is more than you currently have. With that, you have managed to increase your VRAM.
- Continue to boot up your system and check if you now have that much-desired extra VRAM.


