
NVIDIA Control Panel is an essential component in managing the properties of your graphics card, and it can be troubling when the application goes missing. However, you shouldn’t worry as the fix is quite simple, which you will see in this comprehensive guide.
Typically, you can click on your computer screen using your right mouse button to reach the NVIDIA Control Panel found in the menu that appears. Sometimes, it may have disappeared.
If you’re wondering how to bring it back, keep reading. Before examining some of the common troubleshooting options, we’ll explain why this issue occurs in the first place.
There are several reasons why you might be unable to locate your NVIDIA Control Panel, and the most frequent one is your graphics card driver receiving an update. During the installation, something might have been shifted, which then caused the normal flow to be disrupted.
A registry subkey might have gone missing, or a value was mislaid, and there are also countless unexpected errors that could occur. Fortunately, all of these issues can be resolved if you follow these straightforward instructions.
Table of ContentsShow
Missing NVIDIA Control Panel: Step-by-Step Fix
As mentioned earlier, there are several potential reasons why the NVIDIA Control Panel is missing. We’ll walk you through some of the more common ones.
Restart NVIDIA Services
**You might want to try this approach if the NVIDIA icon is also absent from the desktop tray**.
- Press Windows key + R to open the “Run” window, then type in services.msc and press Enter.
- Once the services window opens, look for items with the “NVIDIA” name before them. Right-click each of the items and select Restart from the menu that appears.
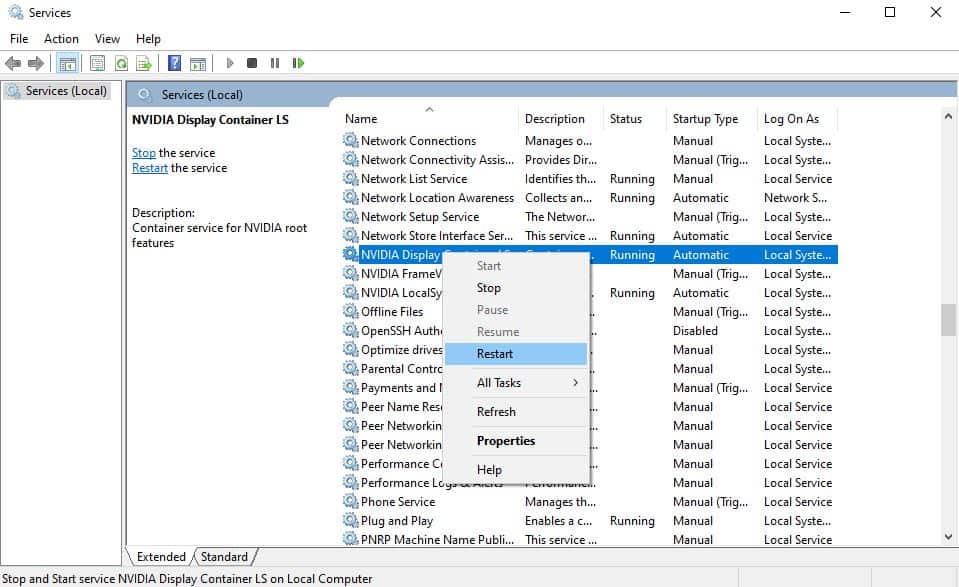
If a service is not operational, make sure you select it and click Initiate.
If you receive the Error 14109 message, right-click the “Start” button, then select “Device Manager”. From here, locate your graphics card’s name (in the “Display adapters” section) and right-click it. Then choose “Uninstall Device”. Don’t worry, this won’t remove your GPU, but it will remove all the faulty drivers. Restart your PC and re-install the drivers.
Manually Launch The NVIDIA Control Panel
Before continuing, let us make it clear that this is not a permanent solution. It will be effective temporarily, yet there may be an underlying issue that must be resolved, and being able to reach the Control Panel might help in troubleshooting.
- Navigate to the C:Program FilesNVIDIA CorporationControl Panel Client location on your PC. The NVIDIA Corporation folder might also be in the Program Files (x86) folder.
- Right-click the nvcplui file and choose the “Run as administrator” option.
Unhide NVIDIA Control Panel
This is often the easiest and fastest outcome as it is entirely possible that the Control Panel was simply hidden. To fix this, do the following:
- Access your computer’s Control Panel by pressing the Windows key + R and typing in “control“.
- Once the Control Panel opens, go to the upper-right corner and change “View by” to “Large icons“. Alternatively, you can choose “Small icons”; it’s entirely up to you.
- Double-click the NVIDIA Control Panel.
- Select the ‘Desktop’ option from the top menu and then tick both “Add Desktop Context Menu” and “Show Notification Tray Icon“.
After executing this, check whether or not that was the issue by either right-clicking your desktop or inspecting your tray.
Use NVIDIA’s Official Solution
This issue has apparently become widespread enough to catch the attention of NVIDIA. The company’s suggested solution goes like this:
- Navigate to C:Program FilesNVIDIA CorporationNvContainer and copy the nvcontainer file.
- Go to C:Users(Your Username)AppDataRoamingMicrosoftWindowsStart MenuProgramsStartup and paste the file you copied.
- Afterward, right-click the nvcontainer file and select “Properties”.
- Navigate to the “Compatibility” tab and tick the “Run this program as administrator” option.
- Apply the settings and restart your PC.
This approach will ensure that the app starts running when Windows begins.
Re-install The Drivers
If the issue in question is indeed being caused by your drivers, a fresh installation should usually do the trick. The ideal way to do this is by using GeForce Experience. This application is usually located in the system tray and can be accessed with a double click. When its window appears, you should do the following:
- Click on the Drivers tab.
- On the right-hand side, you will see three dots showing that there are additional options. Click them and choose “Re-install drivers“.
Another technique is to use Windows Device Manager and remove the drivers from that specific location.
- In the “Display Adapters” menu, right-click your GPU and select “Uninstall the device“.
- Restart your PC.
- Navigate to NVIDIA’s website in your browser.
- Select your graphics card and operating system and download the driver.
- Run the setup wizard and follow the instructions.
Alternatively, you could try downloading NVIDIA Control Panel from the Microsoft Store.
Even the manual reinstallation of the drivers is straightforward, which usually makes this solution the easiest and likeliest to get you the best results.


