
Driver installation has always been crucial, but the process has become much simpler thanks to technological advances. Most of the time, Windows 10 (and some earlier versions) will automatically start the installation wizard upon booting the PC with fresh hardware. However, if you want more control over the process, this guide is for you.
For many years NVIDIA has been consistently outperforming over its main competitor AMD, so it’s no surprise that most users would want an NVIDIA graphics card for their PC. Even if that dynamic might change, NVIDIA is generally the more dependable choice.
There are clear benefits to purchasing a new graphics card, but there’s more to it than just opening up the case, plugging in the card, and playing your beloved game.
Like AMD, NVIDIA offers two alternatives for how to install or upgrade your graphics card drivers:
- GeForce Experience – The easier choice of the two. This NVIDIA GPU companion software doesn’t only keep your drivers up to date but also offers a host of other options made specifically for gamers.
- Manually Installing The Drivers – Many modern PC users won’t be familiar with this method, but older gamers certainly will be. You might remember how many times a graphical glitch was solved by searching the official website for drivers after discovering they hadn’t been updated for a while.
Table of ContentsShow
GeForce Experience
Although GeForce Experience is relatively simple and effortless to use, there are still some crucial prerequisites when installing your drivers using this software.
Before installing your NVIDIA drivers in this manner, it is crucial to determine whether you are upgrading from an AMD card or an NVIDIA card. This is vital because occasionally, drivers may leave particular information in the system’s registry, potentially resulting in issues when switching GPU brands.
Step 0 – Uninstalling The Previous Drivers
If you’re switching from an AMD GPU, you will need to remove its drivers. You can do this by going to Control Panel, then clicking Add or Remove Programs. When the new window opens, and the list of programs is displayed, click AMD Software.

In addition to deleting AMD software this way, we recommend downloading a convenient app called Display Driver Uninstaller and running it from Safe Mode.
This will ensure that every final trace of AMD software that might disturb your NVIDIA drivers is completely eliminated from your PC. When employing DDU, you should choose the Purify and Restart option, as the remaining drivers will be automatically removed from your PC before it reboots.
At this point, your machine will run at a fundamental resolution, and you will need to install your drivers in this state. The excellent news is that, at least for now, you have ensured a clean installation.
If you’re upgrading from an NVIDIA card, it won’t be essential to uninstall your current drivers.
Step 1 – Preparing For The Installation

This probably goes without saying, but in order to install drivers for your GPU, you first need to have the executable files on your computer. The optimal way to get the most current NVIDIA software (or particular drivers) is to go to NVIDIA’s website.
In this step, we’re looking at the driver installation via the GeForce Experience software, which you can obtain here.
Once you have downloaded GeForce Experience, launch it, and you can begin.
Step 2 – Installing The Drivers

When starting the NVIDIA software, you will first be asked to log in to your NVIDIA account.
If you don’t already have an account, you can create one using your social media credentials or inputting your details manually. Either way, after a straightforward registration section, you will be taken to the primary page of Experience.
Here, you will see a list of games you have installed on your PC and will be given the option to improve their performance by adjusting graphic settings after clicking the ‘Details’ button.
We are currently more focused in the ‘Drivers’ tab in the upper left of the window. After clicking it, you will be given the choice of an express installation or a customized one.
The Express Installation will ask no questions and take no captives. It will automatically determine which drivers you need and then install them without requesting permission. During the installation process, your screen will turn dark for a few moments, but there’s no need to worry. This is typical while installing display driver updates.
The **Custom Installation** will give you additional options, but these aren’t essential for the seamless operation of your graphics card. You will also be offered a ‘**clean installation**’ option which restores all settings to their initial defaults and removes any profiles you have created.

After the process (which is identical to the express installation) is completed, you will have your NVIDIA graphics card drivers set up and can start playing your beloved video games.
Manually Installing The Drivers
The process of removing your previous card’s drivers is equivalent here. As this was explained in the former section, we won’t repeat the instructions here.
The difference between these two installation methods is that here you will need to manually select the drivers for your graphics card from the NVIDIA website.
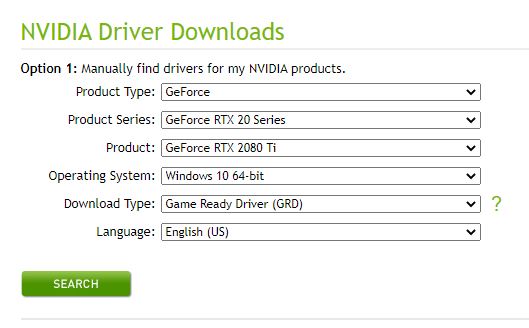
Selecting the suitable driver is straightforward enough, but let’s go through it just to be safe.
The ‘Product Type’ you want is likely ‘GeForce’, but if you’re planning to game on a Titan card, you should select that instead. The ‘Legacy’ option will provide access to display drivers from two decades ago, which you are improbable to want for anything other than scholarly curiosity.
‘Product Line’ will determine which product options you view in the following stage, so it is essential to know the series your GPU belongs to.
Side note: ‘Product’ refers to the specific name of your graphics card. If you bought a GPU with a different manufacturer prefix, for example, MSI or EVGA, you only need to find the precise model name, and you’re ready to go.
‘Operating System’ should be your operating system, provided you can find it in the drop-down menu. If you can’t locate it, it’s likely that your PC won’t be able to run the drivers, and you have a separate problem on your hands.
The ‘Language’ option simply refers to the language you want to use during the original installation.
The significant choice is the ‘Download Type’. Here you are provided either ‘Game Ready Driver’ or ‘Studio Driver’.
GRD is best if you intend to use your graphics card for the latest games so you can receive the most recent driver updates. SD is intended for people who use their graphics cards for more particular purposes, such as 3D modeling or video rendering.
In that case, you won’t need the newest drivers as they are released, and you will only use dependable updates.
Once you’ve found your graphics card’s driver, you will be taken to a download page where you can download and install the drivers using the executable file from your nearby system.
When you run the file, you will be prompted to choose a location for the installation, and the default path will already be selected. After you select your preferred path, the installation wizard will install your drivers, and you’re all set to play your video games.
How To Reinstall NVIDIA Drivers
Some people feel that the need for driver re-installation is a remnant of a previous era, but it’s best to cover your bases in case you experience delay or stuttering in your games.
Similar to the installation process, you have two options for reinstalling the drivers.
When using GeForce Experience, you will find the option in the ‘Drivers’ tab. It isn’t as obvious as we would have liked, but it’s not too difficult to find.
In the upper left corner of the tab, you should see a notification that you have the most recent drivers installed and the specific version of the driver immediately below it. To the right of the driver’s classification, you will see three dots indicating additional options.
When you click on them, you will be given the choice to reinstall the drivers.

From here, you will be taken to the identical screen you saw when you installed the drivers and were offered the ‘Express Installation’ and ‘Custom Installation’ options. We have already described the procedure of selecting each one, so you can refer to that section for the subsequent steps.

If you’re looking to reinstall the drivers manually, you will need to go through the same driver uninstallation process that we have already described. Again, it’s ideal to use Display Driver Uninstaller and completely remove any driver data remaining on your computer.
**The process of selecting the suitable driver for your graphics card is crucial.** Although we have already explained it, we need to stress that it’s possible that you are experiencing **stuttering** or similar issues due to having the wrong driver.
It’s crucial to know exactly which graphics card you have so you can install the correct driver for it.


