Applying thermal paste is an essential skill for any aspiring PC builder.
If this is your first time applying thermal paste, you have likely heard numerous terrifying stories about scorching hardware devastation.
Thermal paste is often confused with thermal adhesive because of its ‘sticky’ look and feel, but they are very distinct. Thermal adhesive is used to bond a heatsink with an integrated circuit. In contrast, thermal paste doesn’t have adhesive qualities and is responsible for transferring heat from the chip to the heatsink.
There are two reasons why you might need to apply thermal paste: you have bought a new chip, or you’re replacing your old thermal paste. There are several different methods to apply the thermal paste, and they all work exceptionally well.
Let’s examine how to do this for both the GPU and the primary processor.
Table of ContentsShow
Applying The Thermal Paste To A New CPU Or GPU
It can be a bit disheartening for a beginner to purchase a high-performance CPU and then discover they have to perform an unfamiliar task that can potentially mess up their hardware. The situation is even more confusing due to the various possible methods of applying thermal paste.
It would be misleading to say there is no hazardous way to apply thermal paste. There is, but some guidance and common sense will enable you to apply the ideal amount in a correct way.
It is essential to know that some CPU coolers come with a pre-applied thermal compound. If that is not the case for you, then you’re going to have to do it yourself.
Step 0 – Getting The Right Paste
Before beginning the process, it’s essential to select the ideal possible paste.
The typical rule of thumb applies here: the more expensive the thermal paste, the better it will perform. As always, there are some exceptions to this rule, but this approach will generally apply.
You want a premium thermal paste to conduct heat from your CPU to the heatsink more efficiently, although a less expensive one will usually perform its role well enough.
As the thermal paste isn’t expensive, you are probably best off spending a few extra bucks for your own peace of mind, if nothing else. Another advantageous feature is that the thermal paste usually comes in its own container that resembles a medical syringe, which enables you to apply the paste slowly and precisely.
This means you can only apply excessive paste if you intentionally squeeze out too much. In reality, you’re much more likely to apply insufficient amounts.
Step 1 – Installing The Chip
Before you start, remember that you should only apply the thermal paste after you’ve installed the chip on the motherboard and secured it. The paste will be placed on top to transfer heat to the heatsink, and it has absolutely no connection to the connectors.
If you’re installing a new CPU to an aging motherboard, you will detach the socket’s latch (retention arm), unscrew the screws, or both, depending on your motherboard. In any case, you should refer to a manual for your particular motherboard model.
After you’ve done this, carefully grasp the chip by its sides to avoid damaging the pins. There is usually an indicator (a small triangle) to help you precisely align the CPU with the motherboard’s socket.
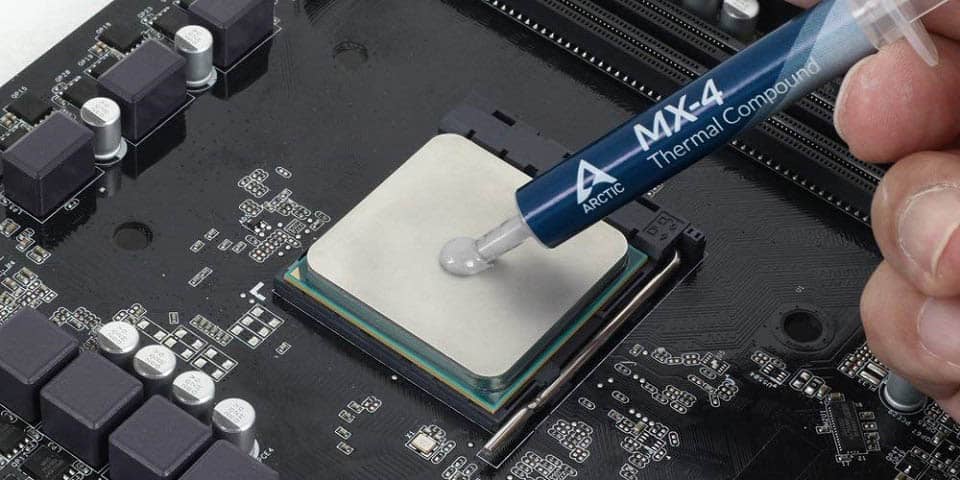
Step 2 – Applying The Paste
After the chip is secured by the latches or the screws, it’s time to add the heatsink to the equation. Remember that it won’t be held together by the thermal paste, which, as we mentioned earlier, has no binding properties.
Before placing the heatsink onto the chip, we first need to apply the thermal paste.
There are several distinct methods, but the most frequently used ones are the ‘dot’ method and the ‘cross’ method.
Dot
With the ‘dot’ method, you apply a dot the size of a grain of rice to the center of the CPU and lower the heatsink with a steady but consistent force. Of course, you shouldn’t slam it down or apply your body’s total force. You simply place it down and try to make it equal on all sides.

A good rule of thumb for this method is to look at the capacitors around the CPU and try to keep the paste about that size. This way of applying thermal paste is the most frequently used, and it’s usually quite dependable.
This method is quite reliable and won’t cause any additional spillage.
Cross
If you want to be on the even more secure side, you can use the ‘cross’ method, which is exactly what it sounds like. You draw a direct line from one corner to the opposite corner, then repeat the process and connect the other two corners, with the two lines intersecting in the middle.

Important reminder: Avoid extending the lines fully to the edges; strive to stay within the CPU limits as best as you can.
The lowering of the heatsink is essentially equivalent to the other method, with even force distribution.
There are plenty more ‘drawing’ methods, but they generally yield the same outcomes. You can use the ‘line’ method or the ‘spiral’ method,’ and they are precisely what they sound like. You can even draw a smiley face, although we’re unsure if it improves the results.
Things To Look Out For
There are two additional ways of applying the thermal paste, and they’re not pattern-type techniques like those mentioned above.
If you apply too little thermal paste, there likely won’t be sufficient of it to conduct heat properly, and you might have overheating issues with your CPU or GPU.
However, if you apply too much thermal compound, you will have an apparent issue.
Naturally, the heat will go through properly, but excessive paste might result in overflowing from the edges under pressure on the heatsink. This isn’t a significant issue, but it can be problematic to remove thermal paste from the motherboard.

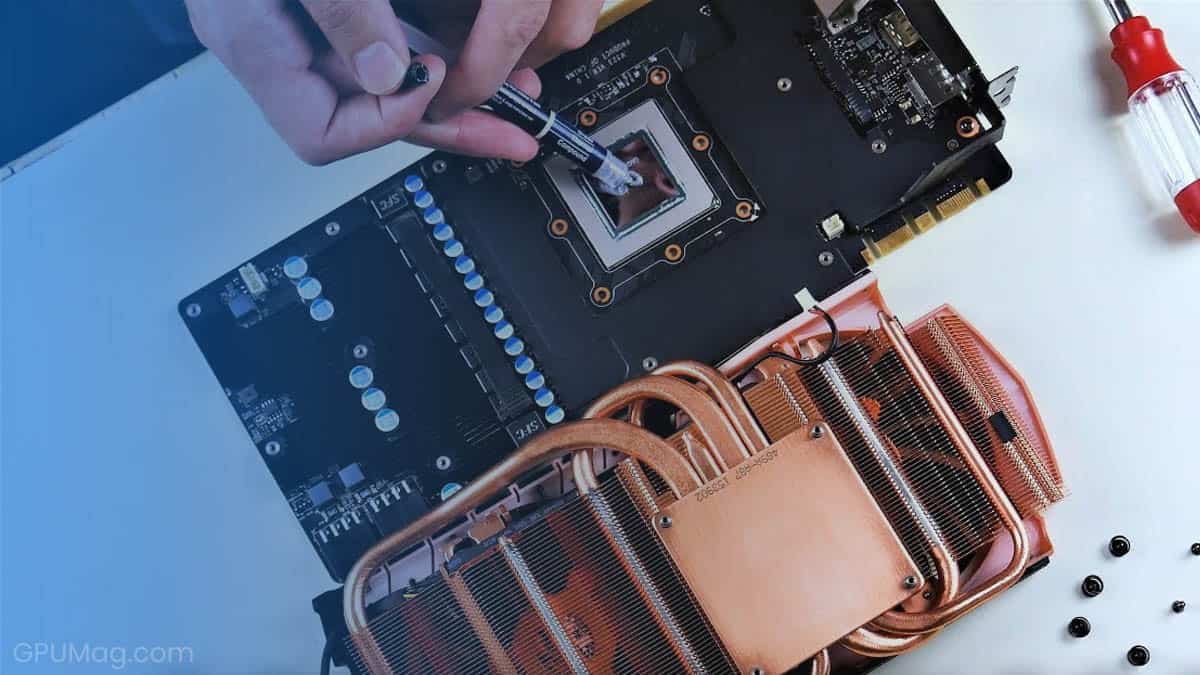
We’ve described the CPU process, but it is quite similar for the GPU.
You will need to open your graphics card to expose the chip. If you’re unsure how to do that, there is a helpful guide below:
Changing The Thermal Paste
There are several reasons to change the thermal paste on your GPU or primary processor.
If you notice that either component is overheating, you should first check whether you need to clean the dust or if the fans are functioning correctly. If you do this and the overheating issue continues, the time has probably come to change the thermal paste.
To do this, you will first need some new thermal paste. Once you have it, you can work on removing the GPU from the motherboard or the heatsink from the CPU.
When you unhook the heatsink from your chip, you will be able to see firsthand how effective your previous application of the thermal paste was.
If you used the ‘dot’ method and the paste wasn’t distributed evenly, you might try the ‘cross’ method this time.
Before proceeding, you should first remove both the cooling unit and the chip from the board, as the subsequent part of the process could accidentally damage it.

There are two different opinions on how to remove the remaining paste, and while both do work, the ideal method is probably a combination of the two. For the biggest piece of the paste, you can use a microfiber cloth or, if you don’t have one, a disposable tissue.
When holding the chip, make sure to grasp it by its edges, otherwise, you may damage the pins and render it useless.

You’ll want to use rubbing alcohol with the concentration of isopropyl alcohol as high as possible and dampen the cloth prior to carefully rubbing the paste off.
The best strategy is to start cautiously in order to get a feel for the fragile nature of the chip. This isn’t to say that it will fall apart in your hands, but it will help you remember not to apply too much force from the start.
Once you have rubbed off most of the remaining paste, you may notice some nooks and crannies that are still dirty. Even if you can’t see this, it’s suggested that you perform the following step.
You will need to use a cotton swab with alcohol to reach those narrow spots. This is the only way you can ensure the cleanliness of the GPU or CPU.
After you have thoroughly cleaned the old paste, you can proceed with the application of the replacement. The instructions are equivalent as when applying them to a new CPU, so we won’t repeat ourselves.
If you notice an uneven spread of the current paste or if your paste rapidly stopped conducting heat properly, you might want to change your application method.


