MSI Afterburner is a renowned GPU monitoring and benchmarking tool. Fortunately, it is also a piece of software that is easy to download and use. In addition to monitoring, it can also be an ideal tool for overclocking and underclocking your GPU.
The MSI name might discourage new users, so let’s avoid that confusion right now. Although it was developed by MSI, this software can be used on all graphics cards, regardless of who manufactured them.
This means graphics cards from the AIB partners of AMD, NVIDIA, and Intel can utilize this device, which includes brands such as EVGA, Gigabyte, MSI, and extra ones.
Table of ContentsShow
What Is MSI Afterburner?

If you have previously heard of this piece of software, you likely have some idea of what it is and what it’s capable of. For such a powerful and beneficial tool, it’s important to know the complete extent of its capabilities, so you can use them to their fullest.
As previously mentioned, MSI Afterburner is an outstanding tool for monitoring and benchmarking. However, it truly shines in its overclocking and underclocking capabilities.
The excellent thing about MSI Afterburner is that it allows you to gradually and systematically adjust the GPU’s core clock and tinker with the memory clock, fan speed, power limit, and core voltage. These features make it a fantastic tool, but the reason we point to it as the best is its simplicity and user-friendliness.
In addition to adjusting and testing the primary options of your GPU, you can also observe how these modifications affect it instantly.
MSI Afterburner comes with a really convenient and, more importantly, resource-efficient overlay interface, which can help you rapidly assess how you have influenced the frame rate in video games.
Another handy feature it can boast about is the ability to create distinct profiles for your settings. For example, you can have a separate overclocked profile to satisfy your gaming needs.
Should You Use MSI Afterburner?
After reading all of this and hopefully being completely aware of what MSI Afterburner is and what it can do, you might wonder if its features are essential for someone like you. As usual, the answer depends entirely on your needs.
If you’re a casual gamer with a budget or mid-tier card, or perhaps even the previous generation’s flagship, you might be surprised by just how much Afterburner can help you increase FPS. In this instance, we definitely recommend giving it a try and finding out for yourself.
Despite what you might expect, even if you’re using the newest state-of-the-art graphics card, Afterburner can still be a useful tool. You can use it to ensure that your 4K cards are performing exactly how they’re supposed to, or you can use it for overclocking to add even more FPS.
A key feature that’s often overlooked is the capability to regulate fan speed. If your GPU is overheating, you should not take this issue lightly, as it can interfere with your gaming experience or even cause serious damage.
Afterburner’s fan speed control allows you to manually adjust at what temperature fans will intervene and at what velocity. You can set it up yourself regardless, but it’s advised to let the software take care of it.
How To Download MSI Afterburner

As mentioned earlier, one of the main reasons why MSI Afterburner is such a great tool is that it’s simple to download and use.
MSI does modify its website from time to time, and they might eventually alter how to actually download the setup file. For now, the process is as follows:
- Go to MSI’s website using this link – Click the ‘Download MSI Afterburner’ button. Again, due to periodic redesigns, the actual layout or button might be different. If you look for the button that says ”download MSI Afterburner”, you should be able to find it. There used to be alternative options for other versions, such as for Android and MSI Kombustor, which we will touch on a little further down.
- Extract the downloaded zip file and click the setup – Be warned that you might receive an alert from your antivirus software. If you used the link above, you should be fine.
- Install MSI Afterburner – This step is relatively straightforward, with the usual license agreement and installation destination. You will also be given the option to install RivaTuner Statistics Server, and it’s highly recommended that you do so. RTSS is a great tool that will help you monitor performance while you’re overclocking. After you click ”Install”, the wizard will complete the process, and you can run MSI Afterburner.
Before we explore the potential uses of MSI Afterburner, let’s briefly look at MSI Kombustor. This is MSI’s stress test tool that is reasonably good and allows you to run stress tests at various presets (such as 1080p, 1440p, etc.). It’s also excellent for showing you the details of the test while you’re running it, and can save a log file for you to review later. It’s a quite dependable benchmarking tool overall.
Although it used to be available directly from MSI’s website, you can now find it at this link. Like MSI Afterburner, it’s quite simple to download and use; just be sure to download the latest version to access the optimal testing.
How To Use MSI Afterburner

Now that you have everything set up, you probably want to dive headfirst into the remarkable world of overclocking. However, before you get there, there are a few things that you need to be careful of.
**Caution and discretion** should be at the top of your list of priorities when undertaking any external modification to any part of your PC, particularly sensitive ones such as the GPU and CPU. By this, we mean you should overclock your GPU (or CPU) in **minor, relatively steady increments** rather than guessing at the optimal performance.
Let’s explore the diverse options that MSI Afterburner provides.
MSI Afterburner Layout

Right below the Afterburner logo at the top center, you will find three buttons: Kombustor, Help, and Information. The ”Kombustor” button will only be accessible if you have it installed. If you don’t, you can click it, and you will be redirected to its download page.
As mentioned earlier, Kombustor is a stress test tool that’s quite beneficial for immediate testing after overclocking. However, there are other, superior, and more thorough stress test software, including FurMark, 3DMark, or Unigine Heaven. We recommend using those.
As of writing, the ”Help” button only leads you to the Afterburner page, but that’s likely the result of a recent overhaul and will probably be changed back soon. The ”Information” button will provide you with basic specifications of your CPU and GPU, but nothing that isn’t better observed by using a distinct tool, such as CPU-Z.
The Most Important Part

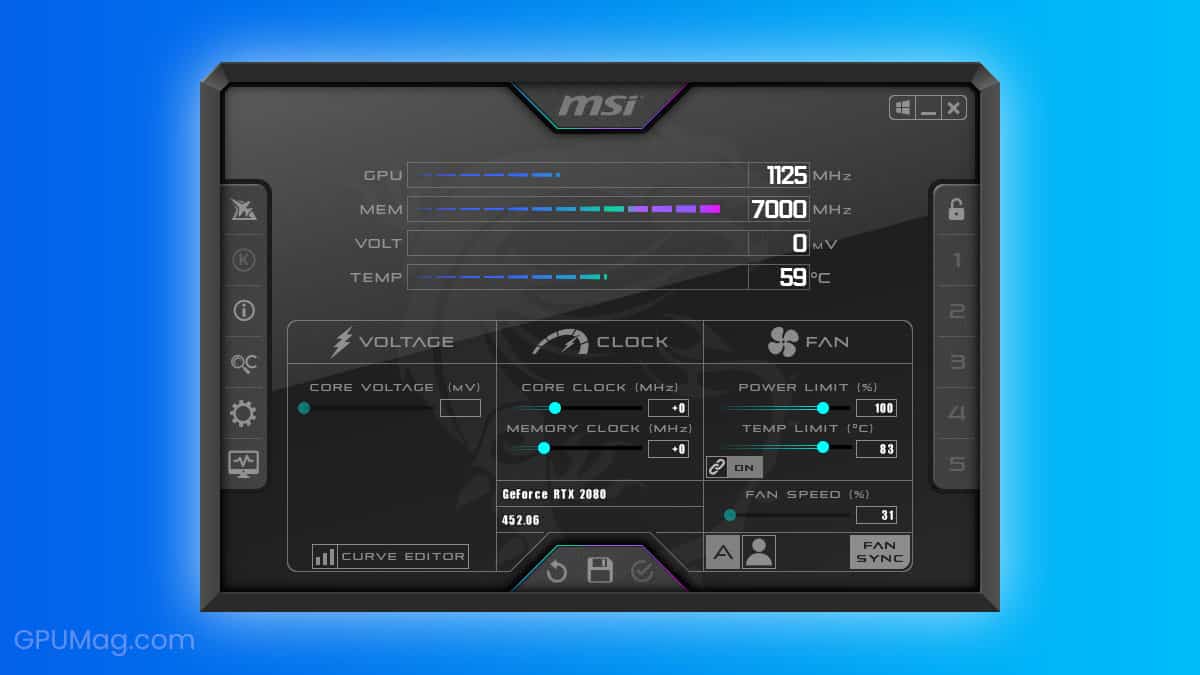
Immediately below these three buttons are the standard GPU controls you will utilize for overclocking or undervolting.
The first one is secured by default for safety reasons, and that’s a praiseworthy decision by MSI. It is labeled ”Core Voltage” and is counted in millivolts (mV). It is used to add additional power to the GPU or to reduce it.
Directly under core voltage control is a ”Power Limit” slider, expressed in percentages. This will adjust the main GPU power limit, but only if your card supports it.
Up next is the ”Temperature Limit”, which should be used in conjunction with the core clock and memory clock increases. The temperature limit is practically essential as the higher clock speed will produce elevated heat output, and you don’t want to have your GPU shut down on you.
The next slider is ”Core Clock”, which will allow you to change the GPU’s core clock. This means more processing power and improved performance. However, as mentioned earlier, you need to have other settings aligned in order to get that performance boost with dependability.
The ”Memory Clock” slider goes hand-in-hand with the core clock slider and is vital to have data returned more rapidly. As with the core clock, you need to have everything else configured to ensure a stable process.
The ‘Fan Speed‘ slider directly below is used to control the main GPU fan speed. It’s set to ‘Auto’ by default which, in all honesty, is the optimal solution. You can tinker with this setting as much as you want, but the simplest way to handle the fans is to let the software solution deal with it.
If you have a 3-fan arrangement on your graphics card, your GPU software might enable you to adjust all three fans individually, but that level of accuracy is largely unneeded.
The Other Buttons
Following the most critical section of the software, we have three more genuinely essential buttons: ”Settings”, ”Reset’‘ and ”Apply”.
As anticipated, the first one will open an additional window for the software settings, the second will reset all settings to their original values, and the final one lets you save your current settings.
The lower tab is useful for minor settings and information, such as choosing whether or not the Afterburner will open on Windows startup, the name of your graphics card and its driver version, and lets you save various overclocking profiles.
While the first two are broader, the last one is more specific. There might be a particular game where you want to have your GPU running at its very finest, while you might be content to leave it at its normal clock otherwise.
Monitoring Tools
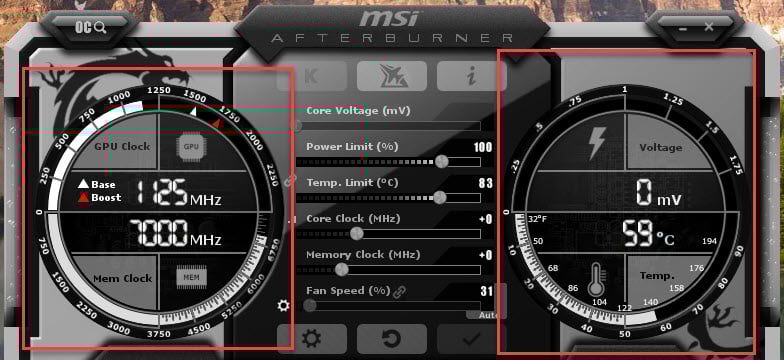
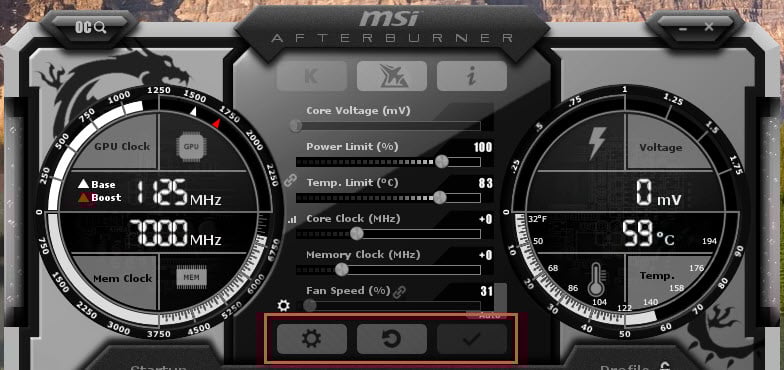
The clocks on each side of this central slider column help you visualize your GPU clock, memory clock, voltage, and temperature. They are helpful for keeping track of your modifications. As it’s easier for most people to memorize information visually, this can be an excellent tool to help you keep an eye on things.
At the bottom of the window is the monitoring window, which suffers from Afterburner’s rigidity as it can only display one graph at a time.
OC Scanner

Finally, we have the OC Scanner, located in the top left-hand corner. OC Scanner is described by MSI as a single-click overclocking tool. Although there are a few additional clicks required, the premise is relatively unchanged. It uses NVIDIA’s algorithm and will run a process to determine what settings are optimal for overclocking your GPU.
To allow the OC Scanner to work to the best of its potential, you must enable voltage control and voltage monitoring within the configuration panel.
After you do that, you will want to push the ”Core Voltage”, ”Power Limit”, and ”Temperature Limit” all the way to the right. Although it may seem contradictory, each of these sliders is set up by a graphics card manufacturer to handle the load up to the GPU’s maximum potential, so you won’t fry the GPU by doing this.
Afterwards, you may select the OC Scanner and start the ”Examine” choice. This will analyze the GPU at four different voltage levels, and using the mentioned algorithm, it will identify the peak stable speed of your graphics card.
After operating the scanner, it’s advisable if you run the “Evaluation” option as well. That way, you will know how much assurance MSI generated for the OC profile that was created a moment ago. Generally, anything over 60% should be acceptable, but it would be perfect if you could get it to 90%.
Once this is done, you can apply the settings in Afterburner. We also recommend saving them in a distinct profile so you can effortlessly switch between the two modes.
Although overclocking isn’t the sole use of MSI Afterburner, it’s certainly the main. Due to how simple it is to download and use, it shouldn’t come as a surprise that it’s often considered one of the most widespread and useful overclocking tools.


