
If you have ever heard of and grasped the concept of overclocking, you likely want to learn exactly how to overclock your GPU. This article will clarify the process and assist you in understanding how it can be beneficial and what you should anticipate.
It goes without saying that the primary reason for overclocking your GPU is to enhance your PC’s performance.
Your reasons for wanting to try overclocking might vary. Your card might be getting outdated and unable to run current games at the same level as before. You might simply want to squeeze in a few additional frames to gain a competitive edge in online games.
Although you might have come to this article already understanding what overclocking is, it can’t hurt to repeat that data.
Table of ContentsShow
What Is Overclocking?

Before understanding overclocking, you should be aware of exactly how the graphics card operates. It is essentially a small computer with its own processor and RAM (here named VRAM).
As with the CPU and RAM, the GPU and VRAM have their own clock speeds, which determine how quickly they can perform operations.
Each of these clocks is provided with certain “factory” settings, guaranteed to be safe by the manufacturer. In theory, you won’t have any issues with these original settings.
The process of overclocking calls for the user to manually adjust these clocks and attempt to make their hardware run faster. If you’re wondering, the opposite process (underclocking) consists of manually reducing the clock to reduce temperatures inside the case.
How Much Can The GPU Overclock Affect Performance?

It’s perfectly reasonable to want to know how significantly your GPU’s performance can truly improve if you decide to overclock it.
The answer to this question isn’t as straightforward as we would like. It largely depends on how much you’re willing to push your GPU. Other key components include having a dependable PSU and adequate cooling in place in order to maintain the stability of the GPU because overclocking can disturb that balance.
It simply isn’t reasonable to expect a 50% increase in performance, but in most cases (and if you do things the proper way), you can enjoy a significant 10-20% boost.
What’s Necessary Before You Overclock Your GPU
In the days when the concept of overclocking was still new, there was a certain mystique surrounding it. Many PC users might have been puzzled if they witnessed it. Today, the process has become extremely effective and simple, so there isn’t much preparation required. In fact, you might not even need to open your PC case.
We still recommend doing so simply to ensure that the cables inside haven’t moved (provided you took care of cable management in the first place) and that they aren’t blocking the air from flowing effortlessly through the case. Make sure the graphics card can “breathe”, as its fans will need to cool even more than before.
Tools

As mentioned earlier, the entire overclocking process has evolved and can now be done without ever needing to access BIOS. You only need a few additional fundamental Windows tools, and you’re good to go.
One of the key components to overclocking is benchmarking. When you think about it, it makes complete sense that you would need a benchmarking tool to compare the situation before and after the overclocking procedure.
Although, for the most part, MSI Afterburner would be an appropriate tool for this job, we recommend using something else such as 3DMark or Unigine Heaven. In fact, ideally, you should use both. This will allow you to have insights from various perspectives.

To perform the real overclocking, we recommend using MSI Afterburner. Don’t be discouraged by the MSI branding; it can be used on any graphics card, founders edition, and AIB alike.
The GPU Overclocking Process
Although the process is relatively simple, there could be some unforeseen bumps along the way, and we’ll try our best to help you navigate past them.
Step 1 – Benchmarking
To find out the current condition of your system and its performance capability, it is essential to conduct a benchmarking test prior to commencing the overclocking process.
Ideally, you should run any of the previously mentioned benchmarking tools and take note of the performance, but you should also conduct the stress test within the game you want to play.
This will obviously be more difficult to measure accurately if there’s no built-in benchmarking tool within the game. Fortunately, a lot of contemporary AAA games pay attention to this detail and have included this kind of tool. Here are some examples: Red Dead Redemption 2, Borderlands 3, Horizon Zero Dawn, Shadow of the Tomb Raider, Assassin’s Creed Valhalla, and many others.
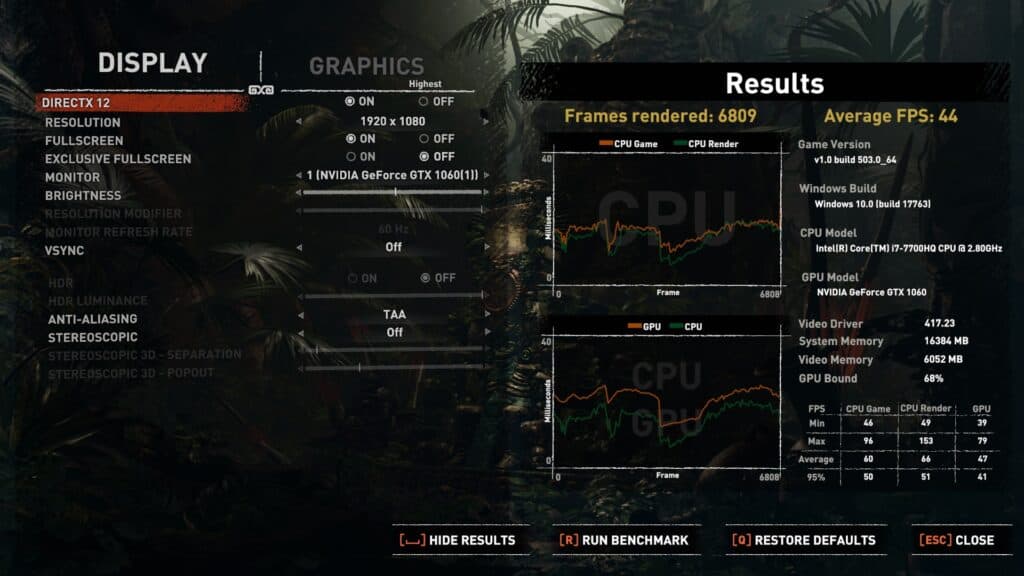
After you have run all these tests, either jot down the results or take a screenshot. This is essential if you want to compare the performance boost you receive when you overclock your GPU.
Step 2 – Overclocking
The primary event. Perhaps it’s best not to look at it that way. In truth, you might need to repeat the process multiple times to achieve ideal results.
Regardless, these are the actions you must take to witness any minor performance differences. Keep in mind to proceed carefully; this can be a delicate procedure, and there is no urgency. While you can search online for the best clocks for your GPU, it doesn’t guarantee identical outcomes for your setup.
Boosting The Core Clock
You should first boost your core clock. We suggest doing this at around a 5-10% increase. Unfortunately, if you’re using MSI Afterburner, you won’t be able to modify the clock by percentages and will instead need to use your own mathematical skills (or Google) and calculate a 5-10% improvement based on the base clock.
If you want to be extra careful, upping the clock by just 5% is almost guaranteed to maintain GPU stability, but this is unlikely to produce any visible results.
Upping The Memory Clock
As you might already know, the overclocking process isn’t exclusive to the graphics card; the CPU is often also subjected to significant overclocking. However, unlike the CPU, the GPU won’t have the same exceptional results simply by overclocking the core.
The memory clock is an essential component for transferring stored data quickly to and from memory and enjoying excellent performances from your graphics card.
Much like the core clock, we recommend raising the memory clock in modest increments to stay on the safe side.
Fine Tuning
There is a compelling school of thought that argues that running a looping benchmark might be the easiest way to see how much you’re improving the performance of your card and understand its constraints. The same logic could be applied to the core boosting part of the overclocking process.
This isn’t a weak approach at all. It’s quite a sensible solution if you’re able to spot any artifacts, such as stray pixels or other visual irregularities.

In any case, you will eventually reach a limit that will probably make itself known in the form of a Windows error or restart. This is not perfect, but it’s also nothing to worry about.
When that happens, you will have discovered your boundary.
After this step, you should return to your overclocking tool and reduce whichever setting you altered last. If you increase the core clock by 25Mhz, lowering it by that amount should resolve it. Otherwise, you will encounter the identical freezing and rebooting issues repeatedly.
Increasing The Power Limit
Once you’ve pushed all the settings as far as you can, there is still something that can help you boost the performance. We’re talking about raising the power limit.
This helps by giving your graphics card additional power and the capacity to overcome its previously set limits.
Giving your graphics card more juice will be noticeable when you try to run a challenging game and hear the sound growing louder inside the case. Don’t worry, that noise is simply the fans working harder.
Step 4 – Fine Tuning
Despite mentioning fine-tuning in the preceding step, this is separate. There, you had to gradually increase the core and memory clock speeds to get the ideal outcome out of the complete overclocking process.
However, it’s vital to note that this stage is voluntary.
This means that, even if you decide to skip it, you will still have gained something from the GPU overclocking process. This step is essential if you’re looking to get the optimal possible results. We will continue right where we left off, and that’s by increasing the power limit.
Essentially, this step provides another opportunity to repeat the identical process. However, we are responsible for telling you that there isn’t much room left for further overclocking. When you increase the power limit to its maximum, you won’t be able to increase core and memory clocks by as much as you did in the previous stage.
This step is hopefully where your patience will shine through. We know that the process leading up to this has probably been thorough. If you’re inexperienced, it might also have been a little intimidating. However, if you persist now, you won’t have to tweak any more, and you should get the best possible performance from your GPU.
Step 5 – Benchmarking Again
This final step isn’t necessary for the GPU overclocking process, but it’s crucial to give you a good overview of the results. This will show you how much you have managed to enhance your GPU’s performance.
It’s crucial that you use the same benchmarking tool that you used to measure the initial performance. Run the test multiple times to verify, then compare the numbers with the original ones.
Once you have the numbers, you can precisely gauge how much you have improved your GPU’s performance. Hopefully, it’s now at a sufficient level, and you can game freely to your heart’s content.


